Are you tired of looking at unsightly scratches on your ceramic cooktop? We know how frustrating it can be to try and remove these scratches with no success.
But don’t worry, we’re here to help! In this comprehensive guide, we will teach you the most effective way to remove scratches from your ceramic cooktop, leaving it looking brand new. Let’s get started!

The first thing before seeing others is what was promised in the title of this post, and it is the trick to remove scratches that we already have on our ceramic hob and the trick is with toothpaste!
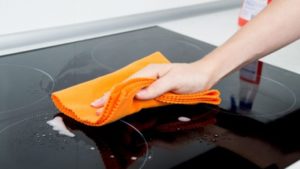
- We clean the ceramic hob with our usual product, it is important to leave it clean before applying the toothpaste
- Pass the vitro again with a clean cloth. to detect where those scratches are.
- Apply toothpaste to the vitro with the cloth, making circular movements where we have the scratches.
- We clean the vitro very well with a damp cloth to avoid leaving traces of toothpaste
Section 1: Understanding Ceramic Cooktops
Before we get into the nitty-gritty of removing scratches, it’s essential to understand what a ceramic cooktop is and how it differs from other types of cooktops. A ceramic cooktop is made of a smooth, flat surface that is heated by electricity. The heat is distributed evenly across the cooktop, making it an ideal surface for cooking.
One of the significant advantages of a ceramic cooktop is its easy-to-clean surface. However, if not cleaned correctly, it can be prone to scratches, which can make your cooktop look dull and unsightly.
Section 2: Causes of Scratches on Ceramic Cooktops
There are several reasons why your ceramic cooktop might have scratches. One of the most common causes is the use of abrasive cleaners or scrubbers, which can scratch the surface. Another reason could be the use of pots and pans with rough bottoms that can scratch the surface of the cooktop.
It’s also important to note that scratches can occur over time due to wear and tear. Even the most careful use of your cooktop can result in scratches, especially if you frequently use heavy cookware or accidentally drop something on the surface.
Section 3: How to Remove Scratches from Your Ceramic Cooktop
Now that you understand the causes of scratches, let’s move on to the most crucial part of this guide – how to remove scratches from your ceramic cooktop. Here are the steps you need to follow:
Step 1: Clean the Surface
Before attempting to remove scratches, it’s essential to clean the surface thoroughly. Use a non-abrasive cleaner and a soft cloth to wipe down the entire surface of your cooktop. Make sure to remove any grease or grime, as this can interfere with the scratch removal process.
Step 2: Apply a Scratch-Removal Product
There are several scratch-removal products available in the market that can effectively remove scratches from your ceramic cooktop. Apply the product according to the manufacturer’s instructions and use a soft cloth to buff the surface gently. Be sure to use a product that is specifically designed for ceramic cooktops.
Step 3: Use a Glass Cooktop Polish
After using the scratch-removal product, you may notice a slight haze on the surface of your cooktop. Use a glass cooktop polish to remove this haze and restore the shine to your cooktop. Apply the polish according to the manufacturer’s instructions and buff the surface gently with a soft cloth.
Step 4: Clean the Surface Again
Once you’ve removed the scratches and restored the shine to your cooktop, it’s essential to clean the surface again. Use a non-abrasive cleaner and a soft cloth to wipe down the entire surface of your cooktop.
Can I use baking soda to remove scratches from my ceramic cooktop?
A1. Baking soda is not recommended for removing scratches from ceramic cooktops as it can be too abrasive and may cause further damage.


